

In this Wix AI tutorial, I built an unpublished service website with a quote form for a fictional office cleaning business. This tutorial shows how I wrote the brief, checked the generated pages, tested the form, and verified where the request went.
The useful result was a five-field Wix Form that rejected incomplete entries and stored two preview test requests in the dashboard, including one from the corrected quote page in mobile mode. The important catch was the path to it: the main Request a Quote button initially opened a different form requiring a phone number. Checking the homepage alone would have missed that problem.
This tutorial follows Wix Harmony Editor with Aria, the interface I received on October 7, 2026. Your account may open a different Wix editor, so use the labels below as a guide rather than assuming every screen will match.
If you are still deciding whether to choose Wix, start with my Wix AI Website Builder review. Here, the goal is narrower: create and check a service-business quote request journey.
Quick verdict
🛠️ Wix AI can create a useful service-site starting point and a working quote form, but you should follow every quote button to its destination before launch. In my test, the requested fields and validation worked on the homepage form. A separate inquiry page used a different configuration, and generated copy needed a factual review.
🎯 Best fit: a small service business willing to edit its pages and verify its lead collection setup.
⚠️ Who should skip this workflow: someone expecting a single prompt to produce a fully verified, launch-ready website without checking content, links, forms, and notifications.
The short version:
- Write a brief with one goal: quote requests, with the exact form fields.
- Uncheck apps you do not need. Wix pre-selected Bookings in my test.
- Replace the shortened design prompt with your full brief before generating.
- Click every Request a Quote button and check which form it opens.
- Test empty, invalid, and valid submissions; find the record in Forms & Submissions and check the notification inbox.
- Check mobile, then publish as a separate step.
What you need before starting
Have a Wix account, accurate business details, a list of form fields and required-field rules, and access to the inbox that should receive quote notifications.
Plan and cost: I confirmed that this demo site was on the Free plan. I bought no plan or domain. Generation, editing, preview submissions, dashboard storage, and the email notifications verified below worked in this test without a purchase. The dashboard showed a four-form allowance, with two forms created; check the allowance in your own account before adding more.
A paid plan is not required simply to publish a basic site at the assigned Wix address, which displays Wix branding. Connecting your own domain and removing Wix ads require an upgrade, according to Wix’s free versus upgraded site guidance. Check your account’s current price, billing period, and form limits before buying. I did not test paid features or publish this demo.
Time: I did not record total elapsed time, so I cannot give a measured completion time. Allow for app selection, generation, page corrections, form tests, and notification checks—not just the initial generation.
What I built and tested
My demonstration business was ClearPath Office Cleaning, a fictional Austin company with three services: recurring office cleaning, one-time deep cleaning, and move-out cleaning. I asked for Home, Services, About, and Request a Quote, using blue and white styling.
The demo remains unpublished. I tested form validation and the initial Home and corrected quote-page submissions in Wix preview, then confirmed both in Forms & Submissions. During this revision, I also verified email delivery for the initial Home test and a new notification test. I did not test a public site, real customers, payments, performance, or search rankings.
Follow-up on October 11, 2026: Home-page metadata and indexing-preference persistence checked in the unpublished ClearPath demo.
Swipe horizontally to view the full table on mobile.
| Form field | Intended behavior |
|---|---|
| Name | Required |
| Required; reject an invalid format | |
| Company | Optional |
| Service Needed | Required dropdown with the three services |
| Message | Required |
1. Give Wix a business brief with one clear goal
Start a separate site and describe the services and the action you want a visitor to take. For this demo, that action was requesting a quote. It did not require a checkout or appointment calendar.
I used the following original prompt:
Create an English-language demo website for a fictional small service business called ClearPath Office Cleaning in Austin, Texas. This is a Prompt Atlas tutorial project, not a real business. Services: recurring office cleaning, one-time deep cleaning, and move-out cleaning. The main goal is to collect quote requests, not sell products or accept bookings or payments. Include Home, Services, About, and Request a Quote. The quote form should have Name, Email, Company, Service Needed, and Message; Name, Email, Service Needed, and Message must be required. Use a clear Request a Quote call to action. Do not generate testimonials, client logos, certifications, statistics, guarantees, prices, phone numbers, street addresses, or email contact details. Include a visible demo notice. Use a simple professional blue and white design. Keep the project unpublished.
For your real business, replace the fictional details with accurate information. Supply services, locations, and contact details you can substantiate. Do not treat generated testimonials or company history as facts.
2. Check the selected apps yourself
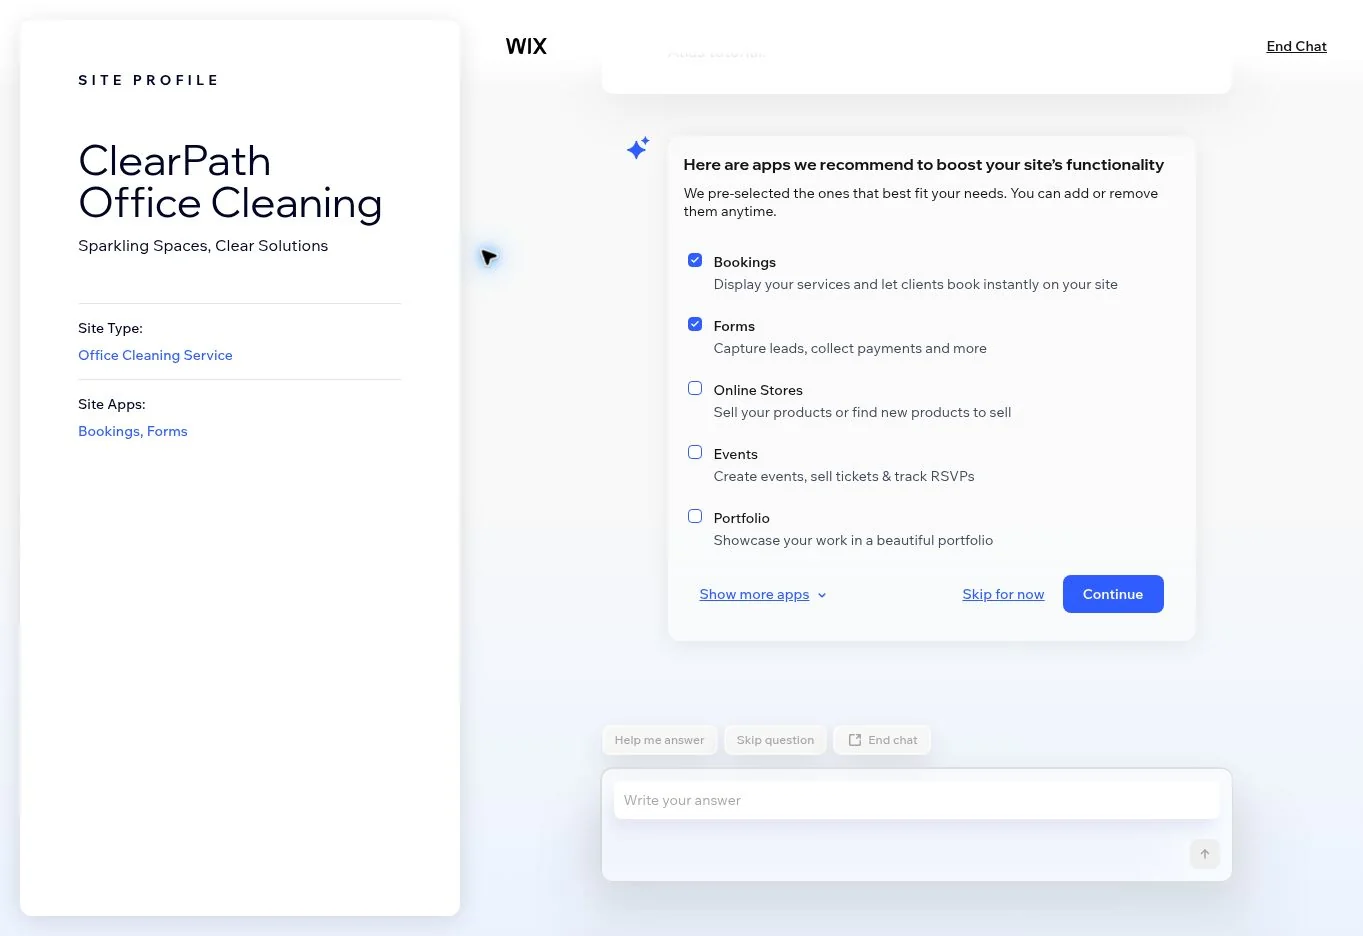
During onboarding, Wix correctly identified a quote form as the main requirement. I clarified that I wanted Wix Forms, four required fields, an optional company field, and no booking calendar, store, payments, blog, or marketing subscription.
Even so, the next app selection screen had Bookings and Forms checked. I unchecked Bookings and kept Forms before continuing.
Tap or click the screenshot to view it at full size.
That is a concrete reason to inspect the selected apps rather than relying on the chat’s summary. Select the tools your visitor journey actually needs. I also skipped the domain offer so I could test the draft before spending money.
3. Recheck the prompt in the design editor
Clicking Design Site opened Harmony Editor with Aria. The generation screen proposed a shorter prompt describing the business, cleaning services, quote requests, and colors. It omitted several restrictions from my original brief, including the detailed field setup and limits on unverified claims.
I replaced the summary with my full original prompt and added this exact instruction:
Use Wix Forms. Service Needed must be a required dropdown with Recurring Office Cleaning, One-Time Deep Cleaning, and Move-Out Cleaning. Company is optional. No Wix Bookings, store, calendar, payments, or marketing subscription.
Then I clicked Generate Site. Give the builder time to finish before testing the preview; parts of my form appeared progressively while generation was still completing.
Once the site is ready, inspect its pages. In my first version, the demo notice was visible, but the copy also described a “clinical, high-tech approach” I had never provided. The footer included links to generic social network homepages. Neither belongs on a finished business site without a deliberate reason.
4. Follow the quote button and inspect its form
What to check
- Click each quote button from Home and every other page that offers it.
- Confirm that its destination contains the intended fields and required-field rules.
- Check that the menu says Request a Quote and contains only one intended quote destination.
What happened in my test
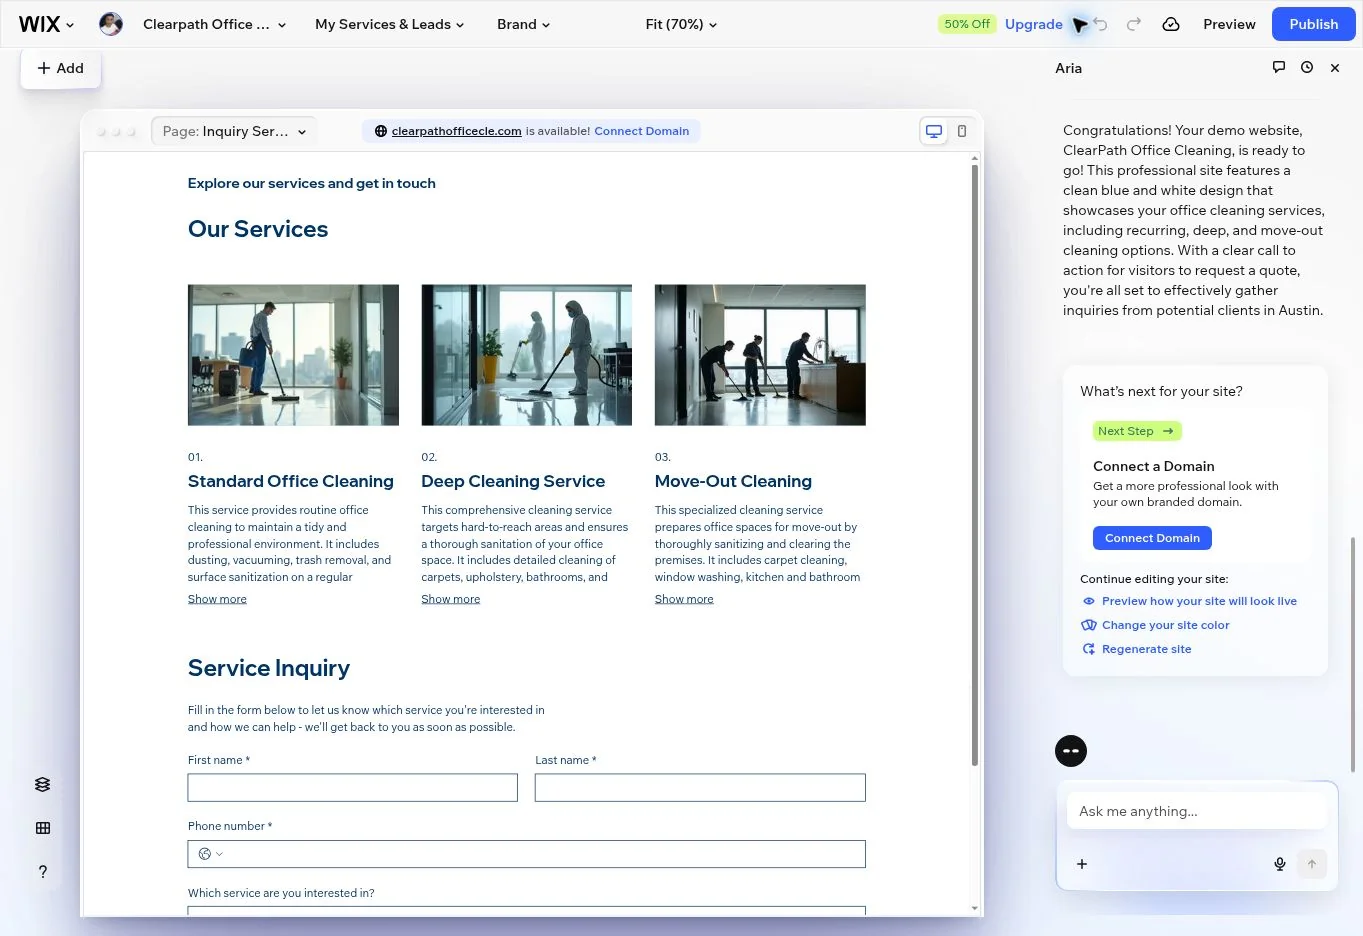
The Home form had the five requested fields, but the main button opened Inquiry Services Page and a different form. That form required first name, last name, and phone, had no email field, and made service and message optional.
Tap or click the screenshot to view it at full size.
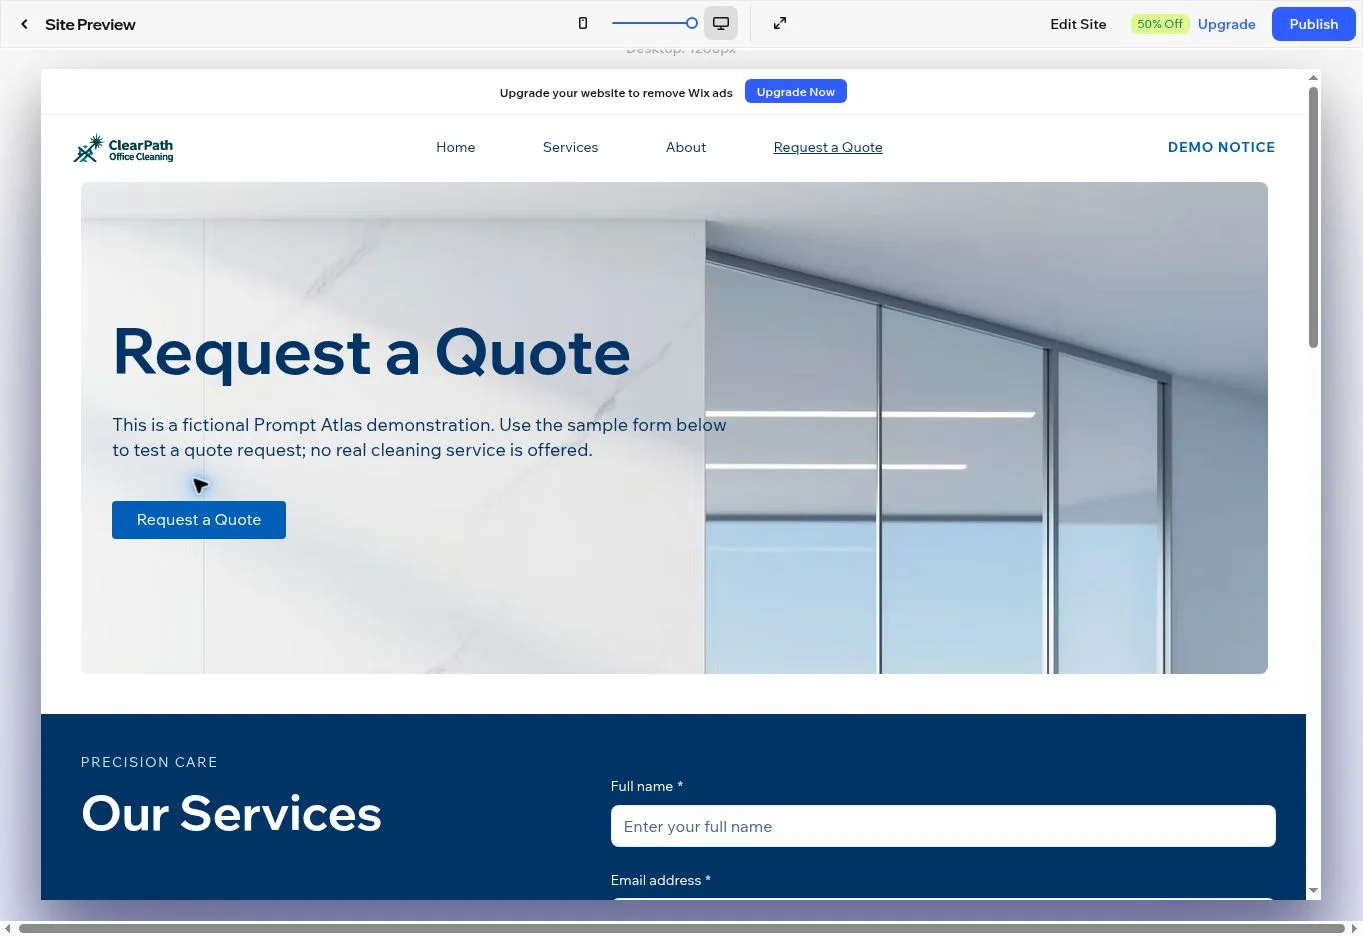
Two targeted repair rounds reused the correct form on a Request a Quote page, removed the duplicate quote menu entry, hid the old inquiry page from navigation, and corrected the new page’s heading and introduction. The Services CTA then pointed to the intended page, and the generic social bar was gone. The URL still ended in /home-1, so the renamed page also needed a descriptive slug.
About required a separate correction: Aria initially reported a fix, but the actual page still contained generated company history and clinical claims I had not supplied. A targeted instruction replaced that text. Its main heading remained an H2 despite my H1 request. Review the page itself after each AI edit.
Tap or click the screenshot to view it at full size.
For manual configuration, Wix’s Harmony form instructions describe selecting the form and opening Edit Form. Adjust fields and settings there. To reuse the intended form, choose Add existing form from the Add panel.
5. Test validation, then verify the stored submission
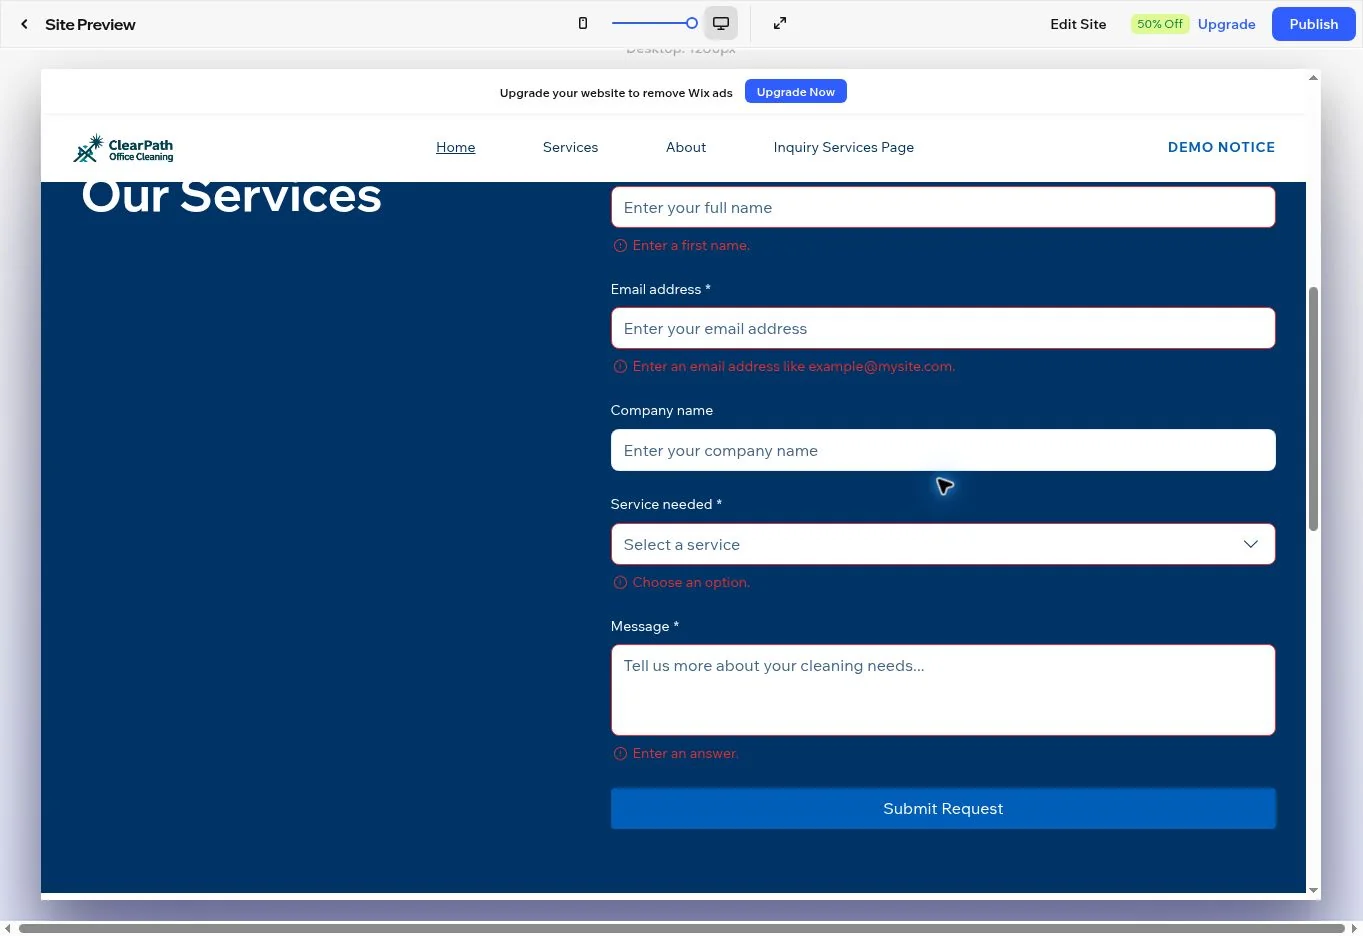
A form’s appearance does not tell you whether its required fields behave correctly. I ran three checks on the generated Home form.
Swipe horizontally to view the full table on mobile.
| Test | Observed result |
|---|---|
| Submit all fields empty | Errors appeared for name, email, service, and message; Company remained optional. |
| Enter an invalid email with the other required fields filled | Wix showed an email-format error. |
| Submit fictional valid details and leave Company empty | Preview showed a success message, and the dashboard stored the test request. |
Tap or click the screenshot to view it at full size.
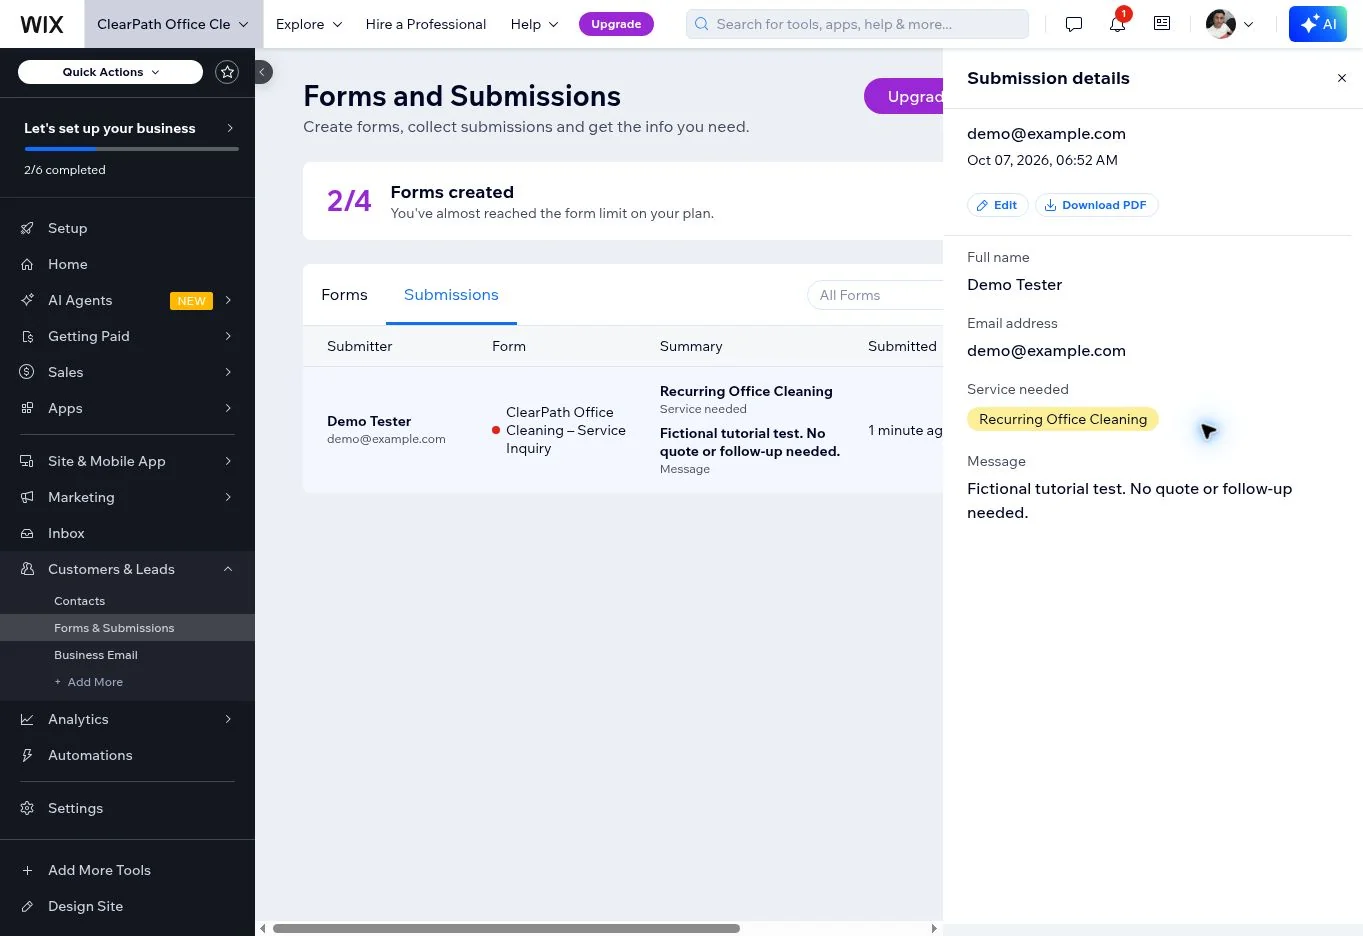
My valid test used Demo Tester, demo@example.com, Recurring Office Cleaning, and the message “Fictional tutorial test. No quote or follow-up needed.” After submitting, I opened Customers & Leads → Forms & Submissions → Submissions in the site’s dashboard and viewed the record.
The stored details matched the test values. Company was absent because I had left it blank.
Tap or click the screenshot to view it at full size.
Check the confirmation and the email separately
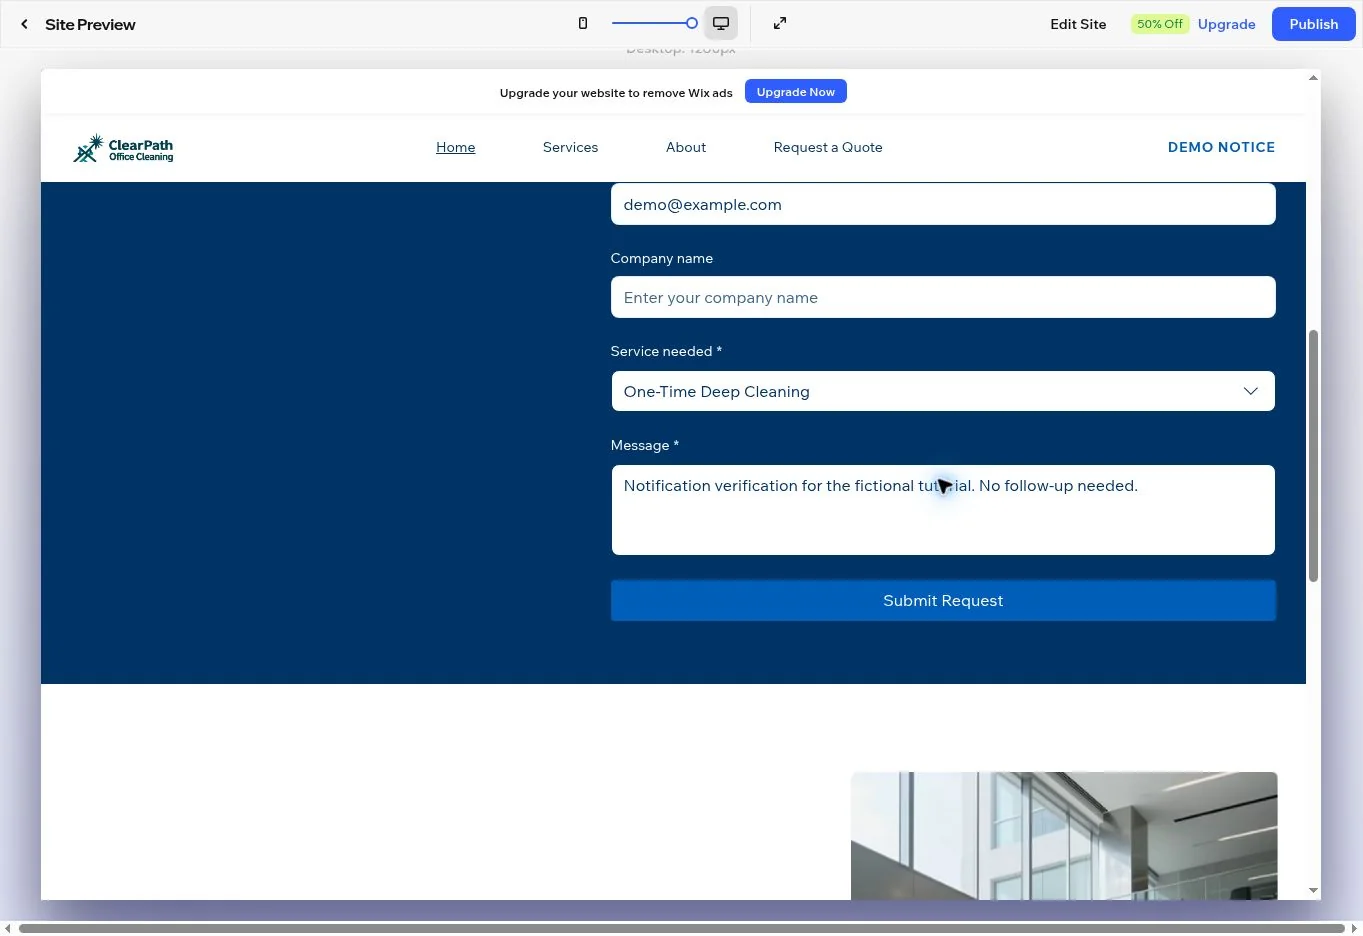
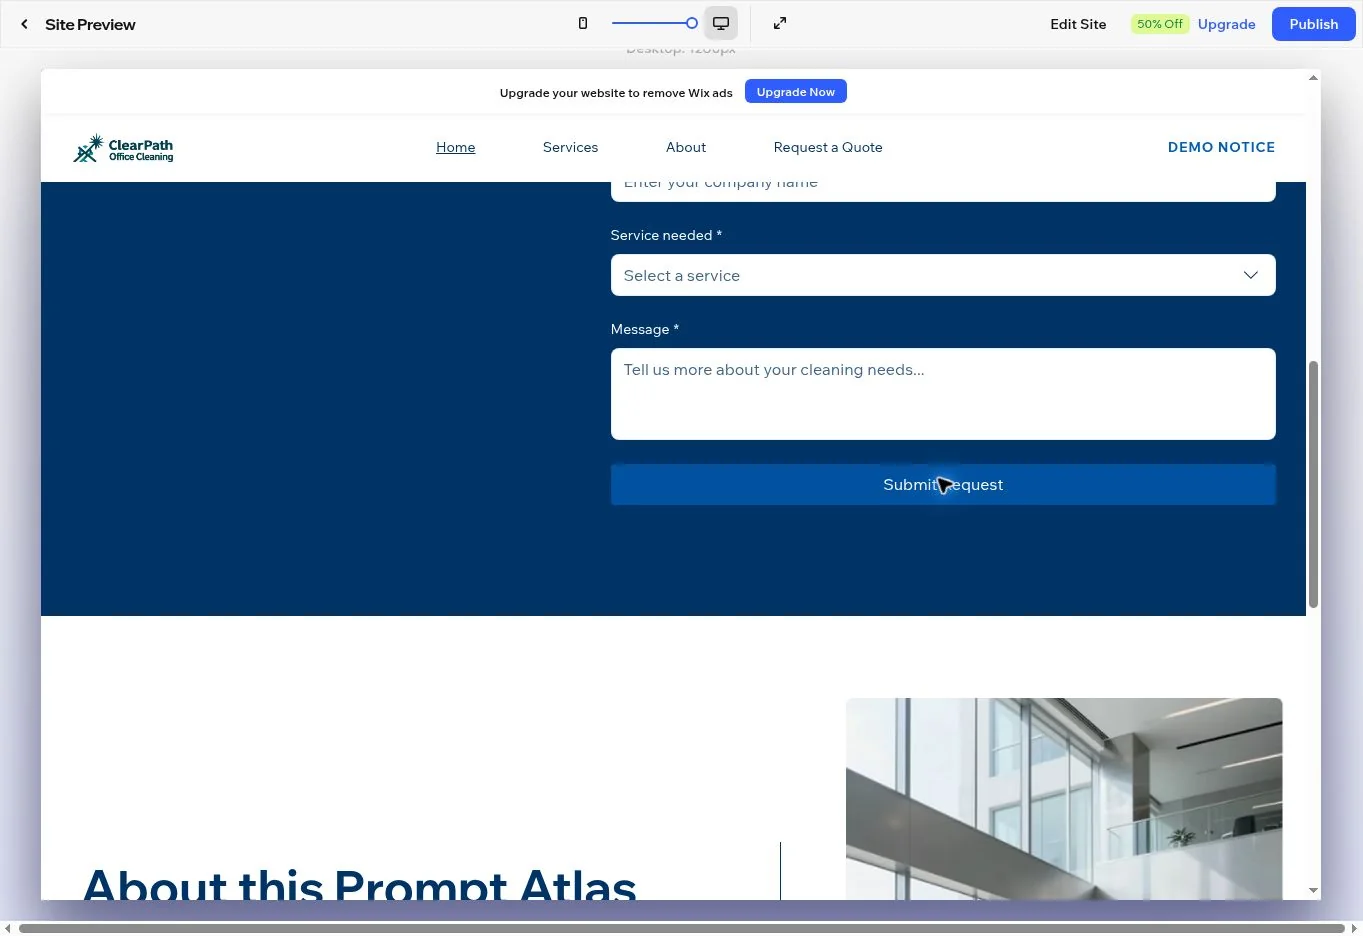
During this revision, I filled the Home form again with fictional details and left Company empty. Wix cleared the fields after a successful submission. The screenshots show the filled form before sending and a later successful submission state; the values do not remain in the form after success. The confirmation text, “Thanks, we received your submission,” was present, but its dark blue styling made it hard to read against the blue background. Check success-message contrast as well as error messages. I temporarily increased the confirmation display time for the capture and restored its original eight-second setting afterward.
Tap or click the screenshot to view it at full size.
Tap or click the screenshot to view it at full size.
In Forms & Submissions, open the form’s More Actions menu, choose Form notifications, and review its email automation. Wix’s notification instructions explain how to edit the Send an email action and its recipients. The demo already had an email automation, and delivery reached my connected account inbox; no new recipient was needed.
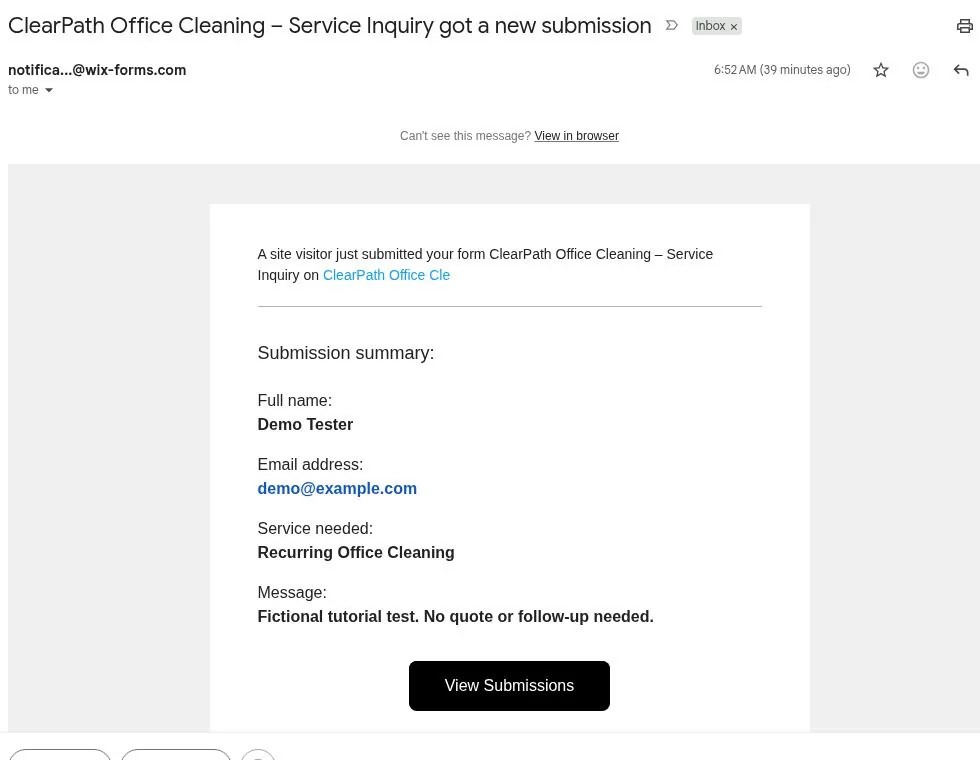
I found the initial Demo Tester notification in Gmail, received October 7 at 09:52 UTC, with the correct email, recurring-cleaning selection, and message. I then submitted Notification Demo Tester, demo@example.com, One-Time Deep Cleaning, and “Notification verification for the fictional tutorial. No follow-up needed.” Its notification arrived at 10:33 UTC, with matching details. This verifies those individual deliveries; it does not establish delivery for every submission.
Tap or click the screenshot to view it at full size.
For your business, confirm the intended recipient, send a clearly labeled test, and open the delivered email. A dashboard record alone does not prove email delivery. Repeat the complete journey on the published site before relying on it for customers.
6. Check mobile and make publishing a separate step
Wix Harmony’s Preview view supports desktop and mobile layouts. Its preview and publishing documentation distinguishes saving a draft from making the site public: saved edits become public only after publishing.
I switched the preview to Mobile: 390px. The five-field form stacked in one column, the submit button was visible, and submitting empty fields showed the same four required-field errors. The service control offered the three requested options. The mobile menu opened successfully; checking it also exposed the duplicate quote navigation entries before the cleanup.
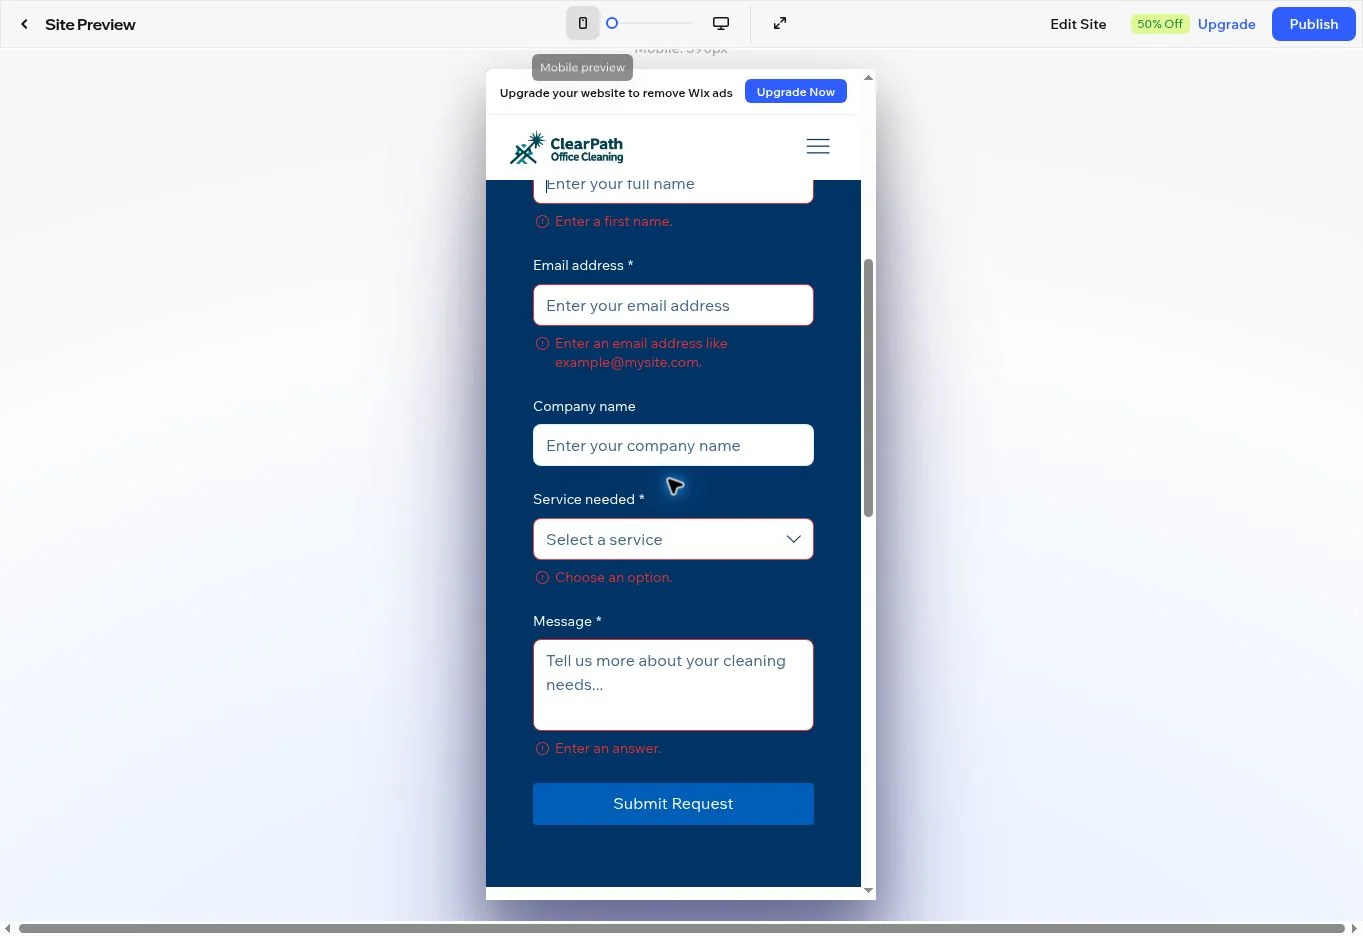
Tap or click the screenshot to view it at full size.
These are preview checks at one width, not tests on a physical phone or a claim that the whole site meets accessibility standards. In particular, the red error text on the dark blue form deserves a contrast review before launch.
After the quote page cleanup, I sent a second request from mobile preview using Mobile Demo Tester, demo@example.com, Move-Out Cleaning, and “Mobile preview test of the corrected quote page. No follow-up needed.” I again left Company empty. The dashboard showed both this request and my earlier Home-form test under the same form name.
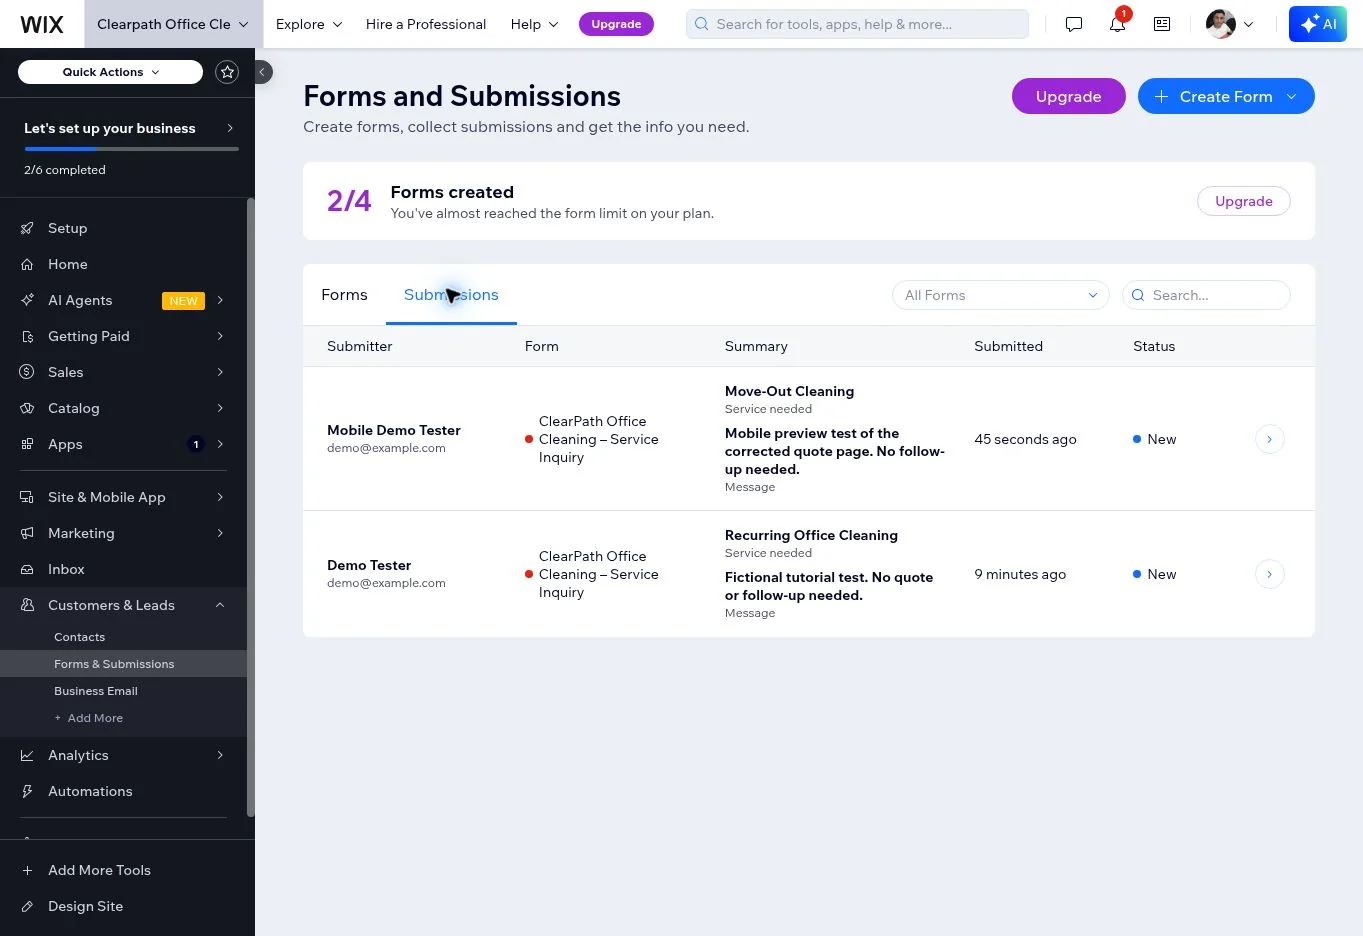
Tap or click the screenshot to view it at full size.
Before launching a real site, check the navigation, quote button, dropdown, field labels, validation messages, and submit button on a narrow screen. Review each page’s claims and replace generic social links with real profiles or remove them. Then check page titles, descriptions, and the actual published journey.
My demo still needed a broader content and SEO pass: Services retained promise-like descriptions, and some heading levels needed attention.
Checking SEO settings before publishing
I returned to the unpublished ClearPath demo on October 11, 2026, to check the page settings that the original walkthrough had left untested. This follow-up covered the Home page only; it did not test Google indexing.
In my Harmony interface, I opened the Page menu, selected Manage Pages, opened Home’s settings, expanded SEO, and clicked Go to Tasks. Wix’s official guide also describes a route through the page’s More Actions menu, then SEO and accessibility → SEO. The labels and route may differ in your editor.
Under Set title tag, I edited the default title and clicked Apply. Under Add meta description, I filled the empty field and applied it. I kept both values explicit about the fictional project:
Swipe horizontally to view the full table on mobile.
| Setting | Value saved in this demo |
|---|---|
| Title tag | ClearPath Office Cleaning | Fictional Service Website Demo |
| Meta description | Explore a fictional cleaning website built for a Prompt Atlas tutorial. Review sample services and a quote request form; no real cleaning business operates here. |
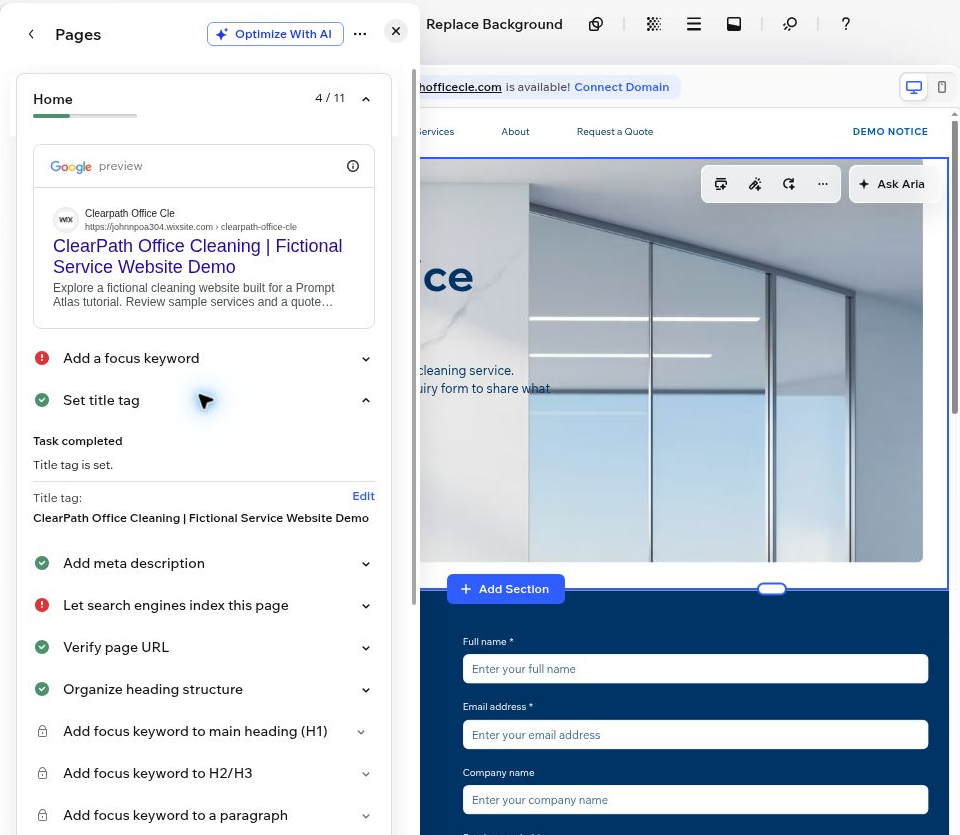
Tap or click the screenshot to view it at full size.
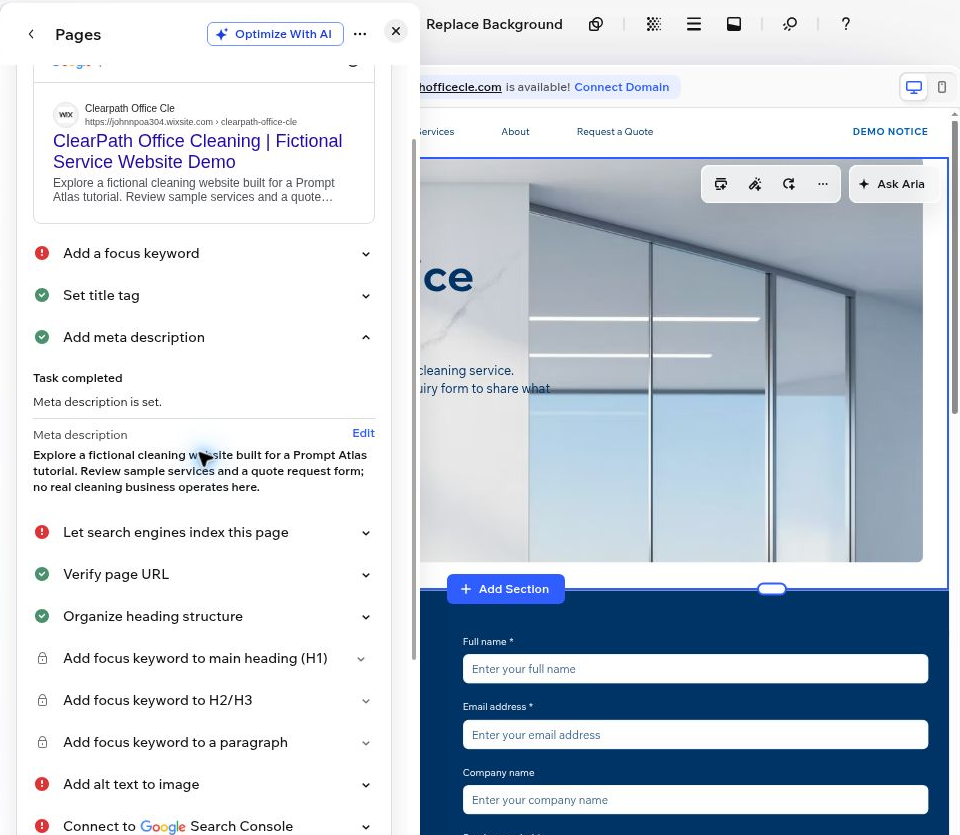
Tap or click the screenshot to view it at full size.
I then closed the editor tab and reopened the same project from the site dashboard. Both values remained in the page’s SEO panel. This verified one save-and-reopen cycle, rather than just a change visible while the editing panel was open.
The Let search engines index this page control was available before publication. It started enabled; I disabled it, clicked Apply, and confirmed that it stayed off after reopening. That is the saved permission setting for this demo—not evidence that Google has indexed or removed a page. The dashboard still labeled the project Not published.
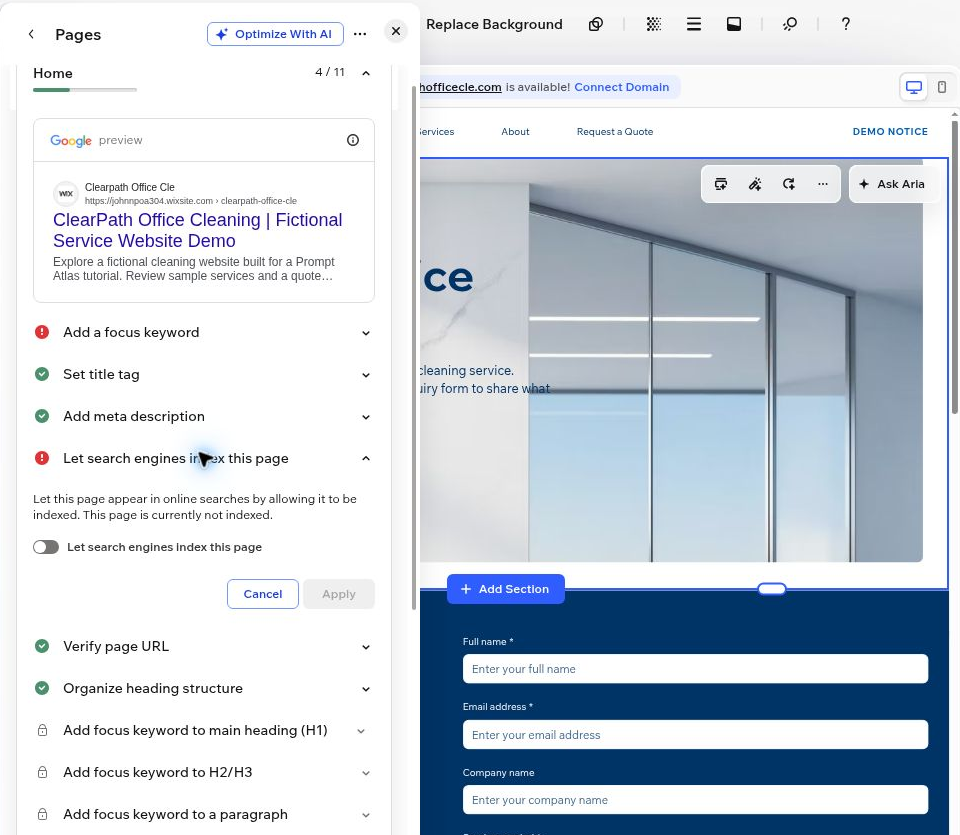
Tap or click the screenshot to view it at full size.
To repeat the check, apply each change, close and reopen the project, and compare the full values in the same page’s settings. Use the indexing control deliberately for your own page. The Google-style preview is a Wix preview, not proof of how a live search result will appear. I did not publish the demo, connect it to Search Console, inspect live robots tags, or measure crawling or indexing speed.
I left this demonstration unpublished. A successful preview submission was useful evidence; it was not a reason to skip the remaining launch checks.
Common mistakes this test exposed
Swipe horizontally to view the full table on mobile.
| Mistake | What to check |
|---|---|
| Assuming the onboarding chat controls app selection | Review the checked apps before continuing. |
| Accepting the shortened design prompt | Reinsert missing facts, field rules, and restrictions before generating. |
| Testing only the form visible on Home | Click each quote CTA and inspect its destination. |
| Treating the success message as the final check | Find the submission in the dashboard and separately test notifications. |
| Accepting generated copy as verified business information | Review claims, contact details, demo labels, and social links. |
Final verdict
The strongest part of my test was the five-field Wix Form: required-field validation, email-format rejection, dashboard storage, and email notifications all worked for the preview tests I verified. The weakest part was consistency across the site. The primary quote button initially led to a different form, despite a detailed brief.
Use Wix AI to produce the draft, then verify the entire journey from the visitor’s first click to the stored request and delivered notification. That check is what turns a promising generated website into a service-site setup you can assess before launch.
For a broader choice of builders, compare Hostinger vs Wix AI Website Builder or explore my tested AI website builders for small business.




Leave a Reply